Easter bunny

Hooray, Easter time!  I don’t only love this period because it’s a good excuse to eat too much chocolate (Easter egg overload !!!), but also because I can decorate my house. For sure you also know the little yellow fluffy chicks, the pastel coloured Easter eggs and then there is this cute paper rabbit DIY…

What you will be needing:

  • template
  • thick paper
  • scissors and/or cutter
  • adhesive foil
  • glue (or double sided tape)

And then…

When printing the PDF document, change settings to “poster” format. In this way you can scale the template to A2 format and have a much bigger rabbit. It is also recommended printing on thicker paper in order to make the rabbit more solid.

Once printed I placed the template on adhesive foil, the printed side still visible. An extra helping hand might be useful here. Normally when you put the foil on furniture, you make the surface wet in order to be able to move the foil a little bit. With paper this is – unfortunately – not possible. Precision required!

When the adhesive foil sticks to the paper, start cutting. Do this as precise as possible since all shapes must fit together very nicely. Cut all the lines inside the figure gently (!) with a utility knife and the help of a ruler. This will help you to make folding more easy.

You will need to fold all the lines. Then you can start gluing all parts together. This might be a little tricky sometimes, but hey, you can do this!! 😉 I started gluing clockwise and finished with the backing. I think this is the best way to not make it too hard for yourself. Anyhow, the result will be worth the tinkering.

Simple wallet

A while ago, I made a coin wallet. But since I like my paper money much more (read “I like to have it much more”), I thought it deserved a nice wallet too. This one too is very easy, you just need to be able to stitch straight…

Oilcloth wallet

What you will be needing:

  • Rectangle of 16,5 x 20 cm(part A)
  • Rectangle of 6 x 20 cm(part B)
  • Rectangle of 5,5 x 20 cm (part C, optional – if you want to have two extra pouches for your cards)

(see template (1))

And then…

  • Stitch 0,5 cm hems on the longest sides of parts A and B. Since the lower side of part C won’t be visible, you only need to stitch a 0,5 cm hem on the topside.
  • Fold part A double, wrong sides facing. Crease it so the folding line remains (see red line on template (2)).
  • Unfold, place part C around 1 cm above the folding line and stitch its lower side. Next place part B along the folding line and again stitch the lower side. Use tape, paperclips or hairpins to keep the parts in place (read ‘Don’t use pins’ at the tips & tricks-page).
  • Stitch the folding line of the wallet itself, see blue line on the template. It is a good idea to draw a helpline on the middle of the wrong side of part A.
  • Fold part A again, this time right sides facing. Stitch the sides together on 0,5 cm.
  • Turn the wallet right side out. To make this more easy, you could cut the hems smaller, but be careful when doing so! Using a blunt object to push out the corners is also recommended.

The wallet won’t take the right shape immediately, so I placed it under a pile of (heavy) books for a day.

Oilcloth wallet

Multi-purpose-case

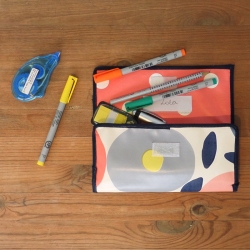
A few days ago, I made a little all-purpose-case. I have to admit I am not that happy with the result: I worked sloppy,  messed it up in the corners and my wire tension wasn’t very good either which I tried to fix, but then made it worse. It was not my day as you might see 😉 BUT, at least the color combination is lovely, isn’t it…

DIY case

What you will be needing

  • 2 pieces of oilcloth (size A4) – inner and outer part
  • 2 U-shaped parts (8 x 4 cm) – sides
  • transparent tissue (7,5 x 3,5 cm) – name tag
  • Velcro or button – closing
  • Bias tape

And then?

I started with some preliminary work at the biggest pieces. First, I stitched one Velcro on the bottom of the outer part and the other Velcro on the top of the inner part. On the inner part, I also stitched a name-tag underneath the Velcro. To make it easier to put everything together in later steps, I stitched both parts together on 1 mm, wrong sides facing. Next I sewed bias tape on the top of the two U-shaped parts. Finally, I stitched all parts together, using bias binder foot. This is the part where I messed it up so I will let you fiddle a little bit by yourself from here 😉 …

I don’t know yet for which purpose I will use the case but I am considering pencil case or makeup case.

pennenzak

pencil case

Flowerbasket

A while ago I bought three little cactus plants in IKEA. Although I like the white flowerpots they are in, I thought my cactuses deserved to be brightened up a bit. Inspired by spiegelstiksels I made three little plant baskets.

You can find the template I used here. Spiegelstiksels described the dimensions you need very clear. Side A is half the width of the pot, side B the height and sides C are the width divided by 8. Don’t forget to add the seams! For one basket you will need to draw the pattern two times. Since oilcloth is a solid tissue, I drew the pattern directly on the oilcloth.

Cut out and put wrong sides facing. Now stitch the outer seams (B and D), following the dashed lines. Then fold to stitch the corners. Turn inside out and done! Since I will be using this basket as flowerpot, I didn’t use lining.

Maak je eigen bloempotjes van tafelzeil

Playing card holder

When it’s raining, I like to play games inside. I prefer card games like Uno or Skipbo. If you have played these games with kids, you know they often struggle to hold all cards in their hands or to hide them from the other players. If you have small hands yourself, you might know this problem too ;). That’s how I came up with the idea to make this playing card holder…

playing card holder

  • You start by cutting all different parts, shown in these instructions. You can softly draw the dashed lines on the tissue, this is where the stitches will come.
  • Then you apply all pieces to the front part: stitch the Velcro on the bottom and the 3 strips on lines A, B and C. On the beforehand I stitched a bias on top of these strips.
  • On the back part, you only need to stitch Velcro on the topside.
  • When all pieces are applied, take the front and back and put them wrong sides facing. I secured both parts to each other using paperclips. Now you can stitch it together by sewing over lines C, D and E.
  • Next, sew the bias starting in the lower right corner. Follow the direction of the red arrow in the instructions. Stop at the upper right corner, needle in your tissue.
  • Now you can estimate the size of the cardboard, which I used for strengthening. This depends namely on how precise you worked. Take the dimensions between your stiches minus around 0,50 cm. Cut out the cardboard and shove it between the two parts.
  • To finish, you continue stitching the bias.
Playing card holder

Since you can fold the holder, it doesn’t take too much space

Baby bib

One of my colleagues became auntie last week. It’s the first baby in the family so she was veeery happy. We thought that a home-made Lola bib would be the perfect present for little Fons.

I looked on Pinterest for a pattern I liked, you can find it on this board. Since I had too many ideas for the design, I thought it would be nice to make a two-sided bib.

Schattige babybavet met walvis van Lola tafelzeilOn one side I used Go with the flow Curaçao and added a cute whale to it. The whale had many little corners so I merely used the handwheel to stitch it on the bib. I stitched the Velcro in the top left hand corner. Make sure you stitch it firmly as it will be pulled a lot.


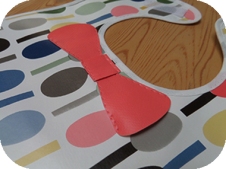
Schattige babyslab met strik van Lola tafelzeilFor the other side I used Spoons Original and added a little bow tie in matching colors. I first stitched the hourglass-shaped part, leaving the sides open. Then, I stitched the middle part on top of it. Don’t stitch the bow tie too close to the border (like I did, oops!) or it will overlap with the bias. Here too you need to stitch the Velcro in the top left hand corner. Finally, I stitched the two layers together with the help of a bias binder foot.

Next week my colleague will visit the little man. I hope the bib will fit. Photos will follow…

Cute Lola oilcloth baby bib with bow tie

Sunglasses case

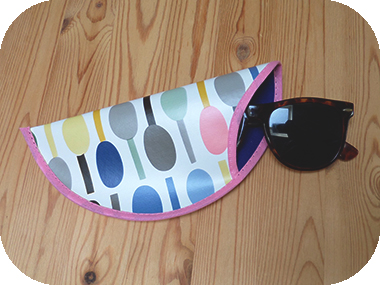
Because it seems like we’ll have to wait a little longer for the sun (sad face), there is more time to sew summer gadgets (happy face). Already to many of my sunglasses got damaged because I put them loose in my purse, that’s why I made this practical sunglasses case.

The case I will be making has two layers, oilcloth on the outside and soft tissue on the inside. You won’t need much fabric, so you can use leftovers for this project. Cut the two pieces out using this template. (why do I always have to think about pizza when I see it ?!) Feel free to enlarge it or make it more oval. I used diameter 19,5 cm. When drawing the second piece, make sure to mirror the pattern!

sew your own sunglasses case from Lola oilclothnaai je eigen zonnebril hoes van Lola tafelzeil

Once cut out, place the two pieces on each other, wrong sides facing. You stitch the parts together using a bias tape. A bias binder foot might be very useful doing so! Start at the beginning of the arrow (see template) and continue in this direction. Once you have passed the dashed line a few centimeters, fold the circle in two, that the borders overlap. Now continue to sew until the end. Reinforce the last stitches and cut of the bias.

No more scratched sunglasses from now on!

DIY Sunglasses case from Lola oilcloth - tafelzeil

Bikecap

Since you don’t change bike every now and then, I love to add cute accessories to cheer it up. I already made a basket and bags.  Now I made a bike seat cover.

What you will be needing

  • Strip of oilcloth, 9 by 100 cm
  • Saddleshaped piece of oilcloth
  • Elastic, 1,5 cm wide and 1 m long

You start with stitching the elastic on the border of the long strip its back. Make sure you put enough pressure on the elastic, otherwise the bikecap will be too loose.

Then you have to stitch the strip on the saddlepiece, wrong sides facing. Start in the middle of the back of the seat. Don’t stitch the first centimeters of the strip yet. Try not to stitch too fast, in order to be able to follow the shape better.

When you are at the end, cut the rest of the strip, leaving again a few centimeters. Once you have stitched the ends of the strip together, your bikecap is ready!

This cap will help you find your bike back in the bike rack more easy and prevent your saddle form getting wet…

Bathroom baskets

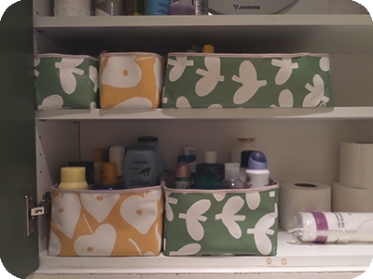
My bathroom storage is above the toilet, every time I need something out of it, I am afraid something will fall. Right. Into. The. Toilet. So far, it didn’t happen (bless me!) but to prevent this, I made a few baskets from Lola oilcloth.

Before

Lola basket

After

One year ago I already posted how to make storage bins. Nonetheless, I will repeat the different steps for you.

  • Determine what size you want your basket to be. Add 0,50 cm on each side for the seam. Draw a square on your oilcloth in the required dimensions. This will be the bottom.
  • Next, you need to draw four extra squares to the sides of the bottom square, like in this template. You end up with a cross-like shape that you have to cut out.
  • Sew the sides of the outer squares together, printed sides facing, so that your bin begins to take its shape. This will be the inner layer of the basket.
  • Repeat these steps to create a second layer. Here too, you sew printed sides facing. When stiched, turn the right side out. This will be the outer layer of the bin.
  • Put the inner layer into the outer layer. You can add a square piece of cardboard to the bottom for extra firmness.
  • Sew the two layers together with a matching piece of cotton border or ribbon.
  • As extra you can fold over the edge so that the design on the inside also shows on the outside.
  • Ready!


Car organizer

One of my friends has a new car. She was telling me about how little space there was to put stuff away. Even though she is the kind of person who always takes too many things with her, people who are extremely organized or who have kids will probably know the problem too… Since I was in a sewing mood (which I am actually all the time) I decided to make her her own Lola car organizer.

I used Donuts Varadero and Love leaf Scuba Blue, two colorful designs of the new Lola collection. I messed around with sketches and paper until I had the design I wanted. For sure I wanted a pocket to put a small bottle in, pockets for pencils and a bigger pocket for a book or a magazine. It was not that easy to puzzle the different parts in place, but I am glad with the result! Little pad on my own back…

Lola car organizer   Lola car organizer